
Photo Gallery
|
Eclipse 1999 Photo Gallery |
|
| by John Walker | ||
 Astrophotography is usually a leisurely affair. Most objects in the
sky don't change rapidly, and capturing dim nebulæ and galaxies
usually requires long exposures watching a guide star while
adjusting the telescope's drive to keep it centred.
Astrophotography is usually a leisurely affair. Most objects in the
sky don't change rapidly, and capturing dim nebulæ and galaxies
usually requires long exposures watching a guide star while
adjusting the telescope's drive to keep it centred.
Nothing in the realm of night-sky astrophotography adequately prepares you to photograph your first total solar eclipse. Totality is so short (just 93 seconds for this eclipse, viewed from Esfahan) that you are under intense time pressure to visually observe all of the eclipse phenomena while capturing the event on film or video. So awesome is the spectacle in the sky that it's not unheard of for even dedicated amateur astronomers viewing their first eclipse to simply forget to take any pictures during totality. Still, they're better off than folks so obsessed with imaging the eclipse they end up viewing the whole event through a viewfinder and never enjoy its magnificence as only the human eye can directly perceive.
I didn't want to miss a second of the visual experience of totality, but I also didn't want to walk away without any pictures either, so I concocted the following scheme, which resulted in the pictures you see below. First of all, since the CCD-based digital camcorder I intended to use to capture totality on video was certified safe to point directly at the Sun (as long as no auxiliary optics were used), I simply set it up on a rock, aimed it about a minute before totality so the complete arc of the Sun's apparent path in the sky for the duration of totality would be in the frame with the lens set to maximum optical zoom, and left it unattended. For additional details, and to view the results, please visit the Totality: The Movie page.
 With video imaging thus delegated to the latest high-tech
gadget, I was then free to turn my attention to still
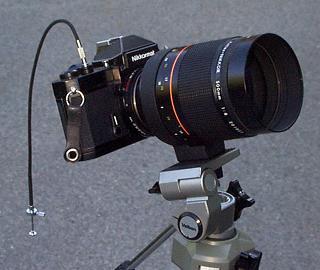
photography, which I entrusted to a 1974-vintage Nikkormat
mechanical camera equipped with a 500mm Reflex-Nikkor
fixed aperture f/8 catadioptric
“mirror lens”. Unlike many present-day “automated” cameras,
which require you to push buttons while watching status
displays in the viewfinder, a Nikkormat can be operated
entirely by touch once you've had a little experience with
it, and I've had a lot. A 500mm lens is a good compromise
for eclipse photography; a shorter lens gives an image of the Sun
that's so small you'll lose detail of prominences, while a greater
focal length runs the risk of lopping off extended coronal
streamers, particularly as the Sun's apparent motion across
the frame is more pronounced with the longer lens. The usual
disadvantages of mirror telephoto lenses, fixed aperture and
a relatively high f/stop, are both ideal for photographing
totality; you can vary the exposure by changing the shutter
speed, and an aperture of f/8 is ideal for exposures of the various
phenomena of totality with the shutter speed range of a typical camera
on high-resolution colour slide film such as Kodachrome 64 (which
was used for all the images below).
With video imaging thus delegated to the latest high-tech
gadget, I was then free to turn my attention to still
photography, which I entrusted to a 1974-vintage Nikkormat
mechanical camera equipped with a 500mm Reflex-Nikkor
fixed aperture f/8 catadioptric
“mirror lens”. Unlike many present-day “automated” cameras,
which require you to push buttons while watching status
displays in the viewfinder, a Nikkormat can be operated
entirely by touch once you've had a little experience with
it, and I've had a lot. A 500mm lens is a good compromise
for eclipse photography; a shorter lens gives an image of the Sun
that's so small you'll lose detail of prominences, while a greater
focal length runs the risk of lopping off extended coronal
streamers, particularly as the Sun's apparent motion across
the frame is more pronounced with the longer lens. The usual
disadvantages of mirror telephoto lenses, fixed aperture and
a relatively high f/stop, are both ideal for photographing
totality; you can vary the exposure by changing the shutter
speed, and an aperture of f/8 is ideal for exposures of the various
phenomena of totality with the shutter speed range of a typical camera
on high-resolution colour slide film such as Kodachrome 64 (which
was used for all the images below).
My eclipse photography plan was, then, as follows. In the final minute before totality, I rough-aimed the camera at the shrinking crescent of Sun by adjusting azimuth and elevation while watching the light from the Sun projected by the viewfinder on a piece of paper. (You can blind yourself by looking at any portion of the non-totally-eclipsed sun either directly, or quicker still with optical assistance. Since I didn't have a safe solar filter for this lens [and even if I did, I wouldn't want to have to juggle it at the start of totality], I used this indirect form of aiming to at least be sure the Sun was in the frame at the start of totality.)
As the moment of totality neared, I'd watch visually for the approach of the Moon's shadow and shadow bands and then, once the lights went out, budget a precious second to look through the viewfinder at the now totally eclipsed Sun (which is safe to observe either directly or through optics) and centre the Sun in the frame and fine-tweak the focus of the lens. I couldn't rely on pre-focusing the lens to “infinity” because the Nikon mirror lens permits one to focus slightly “beyond infinity” to cope with mechanical tolerances in extreme hot or cold weather. So, I pre-focused the lens on a distant object to get it very close to infinity, then fine-focused on the actual eclipsed Sun. The camera was loaded with a fresh 36 exposure roll of Kodachrome 64. At totality I aimed the camera (the Sun was already close to the centre of the frame—either my focusing by projection trick worked well or I was lucky), and I found the edge of the Moon and prominences excellent references for fine focusing. I'm sure the entire process took less than two seconds.
That accomplished, I was ready to simply fire away, using the cable release, adjusting the exposure time between each frame from an initial value of 1/125 second up to several seconds (the latter timed mentally as the Nikkormat's longest built-in shutter setting is one second), then with progressively shorter shutter speeds until either totality came to an end or I ran out of film. Having practiced this numerous times without looking at the camera and once completely in the dark, I expected to be able to make about 20 exposures with varying shutter speeds during totality. Placing the shorter exposure times near the start and end of totality increases the probability of capturing Baily's Beads or the diamond ring effect at the end.
After the initial peek through the viewfinder, all of totality could thus be photographed without ever looking away from the eclipse and related phenomena—it was just a matter of fire the cable release, advance the film, crank the shutter speed to the next setting, and do it again.
So how did work out? Reasonably well. During actual totality I shot 17 frames with exposure times ranging from 1/250 second to several seconds, the shortest clearly showing the numerous prominences around the disc of the Sun and the longest the outer corona (but not the extended filaments which were visible visually). Have a look for yourself—the best images are collected below. The original slide film was scanned by a commercial digital photo lab in Neuchâtel, Switzerland using a Nikon 2000 slide scanner at a resolution of 3542×2361 pixels with 24 bits per pixel, and the resulting images were cropped, resized, and encoded into the JPEG images which appear here. The Nikon scanner was rather finicky about brightness and contrast settings, and there is detail on some of the slides which is not visible in the scanned images. I'm planning to transfer the slides to a PhotoCD and see if I can extract more dynamic range from that format, but I didn't want to let the original irreplaceable slides out of my sight until I had a digital backup in hand.
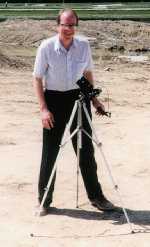
One unanticipated problem ruined (or at least degraded) a number of the 17 slides I shot. Due to luggage constraints, the camera and heavy lens (together they mass more than 1.6 kg) was mounted on a fairly flimsy aluminium folding tripod and was thus rather sensitive to vibration, particularly due to the long focal length of the lens. At first, I was so excited by what I was seeing in the sky that I slipped from my oft-practiced routine of removing my hand from the shutter speed adjustment and letting any vibration damp before pressing the cable release for the next frame. After the first few frames (which had visible jiggles), I realised my error and got back into the intended routine, after which the quality of the slides dramatically improved. However, some of the longer exposures still have visible vibration artifacts, which I now believe was due to the viewfinder mirror slamming up and down, which is a dramatic event on a Nikkormat. I had considered this as a potential problem but decided to accept the risk rather than spend the time to manually lock up the mirror before commencing the exposures. Operating the mirror lock-up on these old Nikkormats is a handful, and it's easy to knock the camera off aim and/or focus while fighting with the little lever to the left of the lens and, of course, once the mirror is up there's no way to confirm focus and aim since the viewfinder is now black. If I had it to do over I'd take the chance and lock up the mirror, but only after practicing it about 50 times.
In all, I'm happy with the images I got, and very happy that I spent only a trivial amount of time during totality looking at anything other than the eclipse. I've penned additional lessons learned, just in case I decide to chase another eclipse, in the document Solar Eclipse Photography Tips.
The following pictures appear, left to right, top to bottom, in
the order they were taken during totality.
Click on images for larger views.
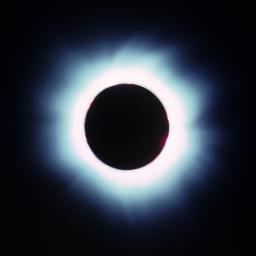
This image was taken seconds after the start of totality. Prominences are visible all around the solar disc, and were immediately evident to the unaided eye. |
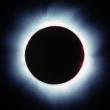
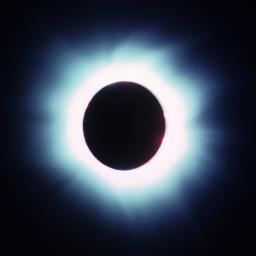
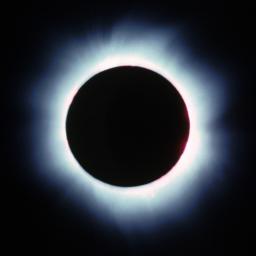
This is a longer exposure around the middle of totality, approximating the visual extent of the bright corona. |
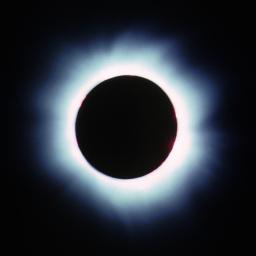
There is simply no way to capture the visual appearance of a solar eclipse on film—the dynamic range in light intensity exceeds the capability of any emulsion. This is a multi-second exposure (hand-timed with a cable release) which captures the outer corona and gives a hint, just a hint, of the magnificent coronal streamers which visually (near the end of totality, as the eye became better dark-adapted) could be seen to extend two to three solar radii. The inner corona is hopelessly overexposed, and the long exposure blurred the edge of the Moon due to its motion while the shutter was open. |
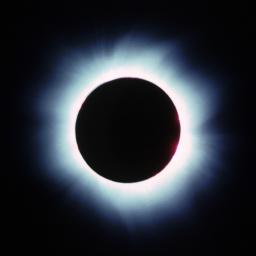
Here's a shorter exposure of the corona, showing additional detail closer to the Sun. |
Halving the exposure time sharpens the detail of the base of the filaments in the corona. |
Once again cutting the exposure time in half reveals the brighter prominences superimposed on the inner corona. (The effect is subtle, and is best seen on the larger scale images; click on the image above to zoom in to a more detailed view.) |
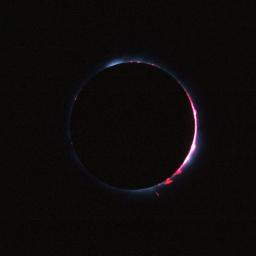
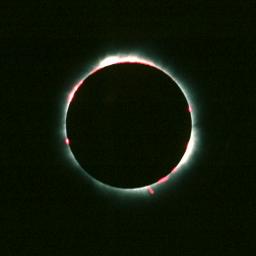
A 1/250 second exposure toward the end of totality enhances the prominences. Look at that eruptive prominence at the five o'clock position! The red Hydrogen-alpha emission line of the prominences is particularly evident in this picture. |
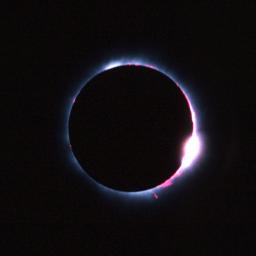
This 1/125 second exposure captured the moment the photosphere (visible disc of the sun) began to emerge from behind the Moon. Prominences and the inner corona remain visible, but vanished in the glare of the Sun an instant later. The burst of light just as the photosphere is covered or re-emerges is called the “diamond ring” effect. |