The Craft of
“Then and Now”
Photography

|
|
The Craft of
|
|
If you have access to old post cards or other photographs of your locality, it's a rewarding project to make “then and now” documents which compare them to present-day views you've photographed from the same viewpoint. There's more to reproducing the perspective of century-old photos than you might think at the outset; I've learnt a great deal in the process of preparing this photo gallery of Lignières. This document describes the techniques and tricks I've developed, and discusses challenges you may face in accomplishing a similar project yourself.
The first step is to digitise the original image, which will usually involve scanning it with a flatbed scanner. Be sure the scanner's glass platen is clean, the fluorescent bulb (if it uses one) has had enough time to warm up and reach its full intensity and intended colour temperature, and that you choose a sufficiently high resolution to capture all the detail in the image, even if you eventually intend to scale it down for use on a Web page. You can always reduce an image in size, but you can't restore detail missed by the initial scan. Images scanned at a higher resolution and then scaled down usually look “crisper” than those scanned directly at the lower resolution.
Be careful to place the photo on the scanner so the edges of the picture are aligned with the vertical and horizontal. This is usually a matter of making sure the edges of the paper are firmly pressed against the borders of the platen, but some images, particularly old contact prints and post cards, are slightly rotated on the paper. You can make a preview scan and check the alignment of the image on the screen (the scanning program's crop box can provide a handy reference for comparison). Tweak the rotation and continue displaying previews until you're happy with it before making the final scan. It's possible to rotate an image with an image processing program, but doing so loses resolution (sharpness), so it's best avoided unless there is no other alternative.
Display the image intensity histogram and adjust the white and black points to include the full intensity range of the image. Choose the highest bits per pixel available on your scanner; an image scanned at 12 to 16 bits per channel captures more of the tonal qualities of even a black and white print than one limited to 8 bits of intensity. It's best to turn off all of the automatic gimmicks in the scanner software such as sharpening, dust and flaw elimination, and the like; since we'll be using a full-function image processing program on the scan, we can do those steps (if required) later, with full visual feedback of the results.
If the image you're scanning is a half-tone (or four colour) printed image as opposed to a photographic print, a high resolution scan may interact infelicitously with the half-tone screen, resulting in moiré patterns. One way to treat such problems is to scan the image at a very high resolution, process it with a low-pass (blurring) filter set to blur adjacent dots into one another, then down-sample it to the desired size and sharpen the result with a high-pass or unsharp mask filter.
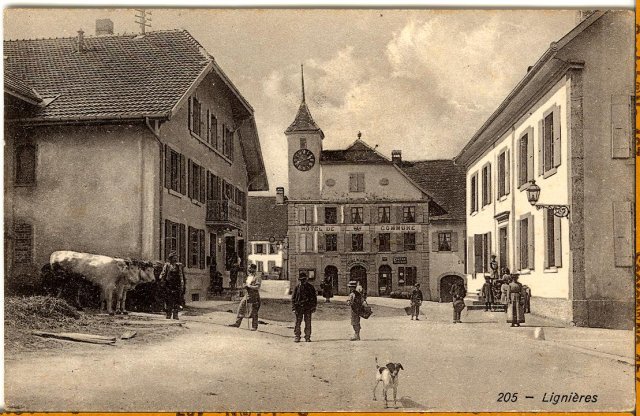
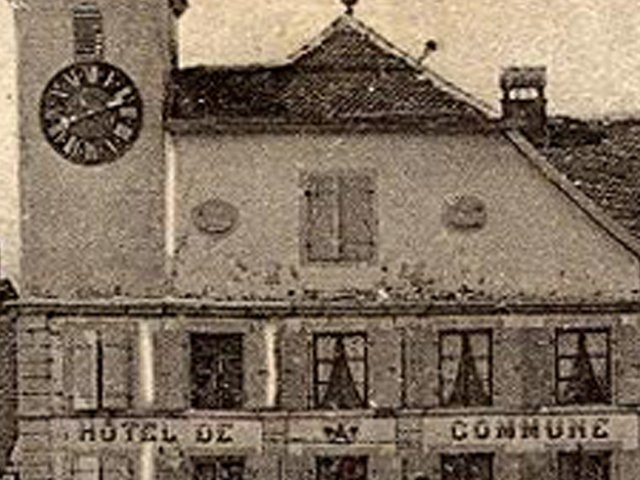
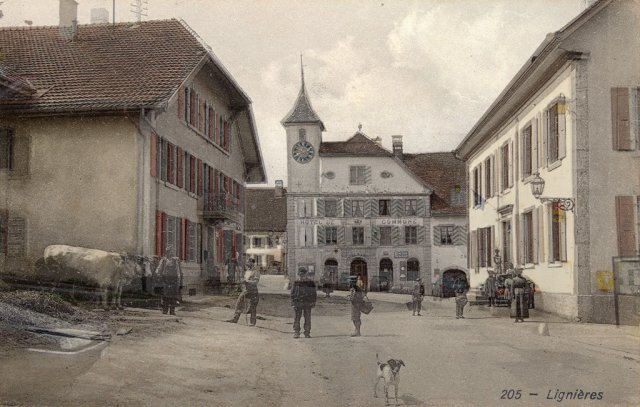
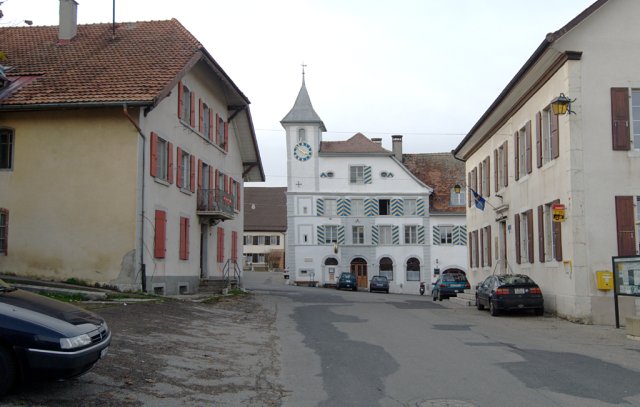
The image above is the result of scanning a post card from the early twentieth century (the postmark on the address side indicates it was mailed in 1911) showing “downtown” Lignières. Please see the gallery page for this image for full resolution views of both sides of the card. In this document all the images are scaled to fit on the page; the actual processing was done on full resolution images, which were scaled down for the gallery pages as the final step in their preparation.
Save your original high resolution scan in a “lossless” format such as TIFF or PNG which preserves all of the information and colour depth in the image. Every time you load and save an image with “lossy” JPEG compression, you lose some of the detail, particularly around edges with contrast differences, so conversion to JPEG should be done only once, at the end of entire process, to create the images for presentation on the Web. If you're creating images to produce prints or for publication, never compress your work to JPEG. I save the original scan with a name that identifies it composed of the series name, image number in the series, and a type suffix, for example “LI25_then_original.tiff”.
Load the full resolution scan into your image processing program. Most of the work in this project was done with version 7.0 of Adobe Photoshop on Microsoft Windows XP. I prefer to use The Gimp on Linux, but it does not presently support images with colour depth greater than 8 bits per channel. I know of no Linux program which supports 16 bit colour depth, is sufficiently reliable, and has the features required for a project such as this.
Your scan will probably have an uneven border due to raggedness of the source document or edge shadows picked up by the scanner. The first step is to crop the image to eliminate this distraction (unless you prefer to preserve it for artistic effect). Cropping can also correct non-rectangular borders not uncommon on old photos. After cropping, do whatever image processing you wish: many scanned images look better with some contrast enhancement and mild sharpening. Since your “then” image is probably monochrome, decide whether you'd prefer to present it as a grey-scale image or with the natural colour patina of the original. In this project, I preserved the colour of the scans in every case: some images were printed in sepia tones, and I didn't want to lose that.
After you're satisfied with the cropped and tweaked “then” image, it's time to scale it to the desired size for the final then and now pair. For this Web project, I decided to scale all images (except for a few whose “then” photos had been scanned by others and were already smaller) to a size of 1024 pixels in the longer (usually horizontal) dimension, with the shorter dimension whatever size preserved the aspect ratio of the original. Above I show the cropped and scaled “then” image, reduced here to 640×406 pixels; the actual image in the gallery is 1024×651.
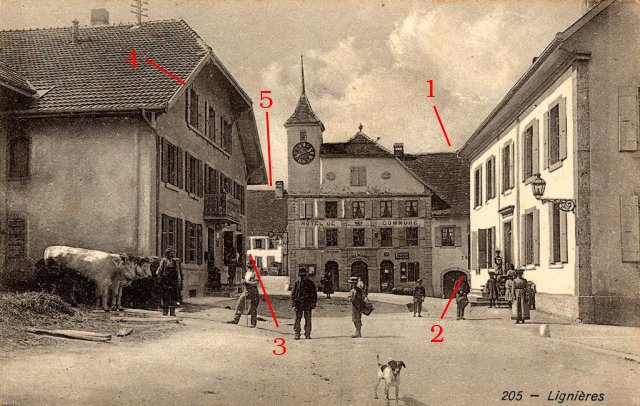
Before setting off to take the “now” picture, print a hard copy of the “then” image and carefully study the relationships between objects in the picture which suggest the viewpoint from which it was taken. Pay particular attention to alignments which are easy to verify and don't require estimating angular distance. For example, in this picture, note that the far corner of the roof of the building in the right foreground happens to line up almost exactly with the roof of the building behind it (1). Further, the wall of the foreground building aligns with the stone edging of the rounded door in the distance (2). As long as these features still exist and haven't been remodelled (something that happens frequently with rooflines, I've discovered—and learnt to keep an eye out for such changes), you can find the right distance and horizontal position pretty closely just by finding a place which reproduces these alignments. To double check and fine-tune the viewpoint, I've also noted that the wall of the building in the left foreground falls right down the middle of the shutter of the third window from the right of the building in the distance (3), that the shutter of the top left window of the left foreground building just appears to touch the overhanging roof (4), and that the gap between the roof of that building and the one in the distance is just about as wide as the shutters on that building (5). [Item (5) isn't as easy to judge as the others, but sometimes that's as good as you can do. In a picture like this one with so many close alignments, I wouldn't bother with one like (5).]
I mark the alignments I've discovered on the paper print-out of the “then” image I'll take with me when I go out to photograph the scene, simply writing on the paper with a red pen and drawing reference lines where appropriate. If your camera has grid lines in its viewfinder, you can use them to follow such alignments when you're on location.
Most of these old-time photos, especially those on post cards, were taken with view cameras, with the picture composed (upside down!) on a ground glass screen by a photographer with a dark cloth over himself and the back of the camera, then exposed on a large glass plate or sheet of film. To reproduce the perspective in such photos, the tool of choice, even in this day of highly automated digital cameras, remains a large format view camera, either exposing sheet film which is then scanned, or with a high resolution digital back. The reason is that this seemingly antiquated technology permits the photographer to control perspective, image composition, and depth of field in ways which are completely impossible with a camera in which the lens and film plane are fixed.
Most view cameras allow both the lens and the film carrier to be shifted and tilted with respect to one another. For example, if you photograph a tall building from ground level with a point and shoot camera, it will look like it's leaning backwards and about to fall over because perspective will cause each successive floor of the building to appear smaller than the one below. With a view camera, one can shift the lens upward while keeping both the lens board and film plane parallel to the face of the building, capturing its entire height without perspective making it appear to be leaning. Many more perspective effects and adjustments are possible with a view camera: see chapter 10 in Ansel Adams's The Camera or chapter 5 of Steve Simmons's Using the View Camera for further information.
Now most people, myself included, have no intention of using a bulky, expensive, and complicated view camera for a hobby project like this. I take the “now” pictures for this gallery along my regular exercise walks through the village, and I'm not about to haul twenty kilos of camera, tripod, lenses, backs, light meter, dark cloth, etc. along with me on my perambulations. (Yes, I know Ansel Adams lugged enormous view cameras to far less accessible places than around a small village. I'm not Ansel Adams. Besides, he often used a mule, and despite sometimes being accused of having the personality of one, I do not possess a pack animal of any species.) So why go into all of this detail about view cameras? Because it is highly probable that the “then” picture you're trying to reproduce was taken with one, by a photographer who used its capabilities, particularly those of avoiding the “leaning building” problem, when making the original negative. If, as I do, you use a fixed-lens camera, even if you're standing in precisely the same place from which the original picture was taken, with your lens at the same height above the ground, you still won't get the same picture because you won't have the perspective adjustments the photographer used when taking the original.
Do not despair. While photographers a century ago were wizards in using camera adjustments and darkroom techniques to tweak their images to be just right, today we have desktop digital image processing tools of which our ancestors could scarcely dream. We'll see how to (more or less) compensate for the lack of camera adjustments when processing the “now” image, but first we have to go and take it.
Since we'll be doing rather extensive image processing on the “now” image, the more pixels to work with, the less the inevitable loss in sharpness occasioned by such manipulation will degrade the final result. If you have a high-resolution (5 megapixel or more) digital camera, that's what you should be using. Many point and shoot cameras, even those with high resolution sensors, have lenses with a limited range of zoom, particularly on the wide angle end which is frequently required in architectural photography. With one of these cameras, you may find yourself standing at the right location but unable to get everything visible in the “then” picture into the frame because you can't zoom out sufficiently far.
Unfortunately, there is no easy and inexpensive solution to this problem. A few fixed lens cameras offer wide angle conversion lenses, but these are often expensive, clumsy (for example, blocking the optical viewfinder), and introduce distortions (such as “barrel distortion”, where straight lines near the edge of the frame appear to bow outward) which are difficult to remove digitally. The “weapon of choice” for a project of this kind is a removable lens digital SLR camera with a wide angle zoom lens. You may also want to take along a lens that covers the normal through moderate telephoto range, but you'll probably find you rarely need it.
The vast majority of “now” photos in this gallery were taken with a Nikon D200 digital SLR, which produces 3900×2616 pixel images in “RAW” mode (which was used exclusively) with a Nikon AF-S Nikkor 12–24mm zoom lens (given the size of the sensor in the camera, this lens is equivalent to an 18–36 mm lens on a 35 mm film camera). This is a very wide lens, and yet more pictures were taken near the wide end of its range than the narrow, which itself was considered “wide angle” in the age of fixed focal length optics. A few pictures, mostly overviews from a distance, were shot with the AF Nikkor 28–200 mm (equivalent to 42–300 mm on a 35 mm camera) lens. The 10 megapixel class sensor in the D200 provides more than enough resolution for a project like this; I doubt the difference would be apparent on the final Web pages had a 5 megapixel camera been used instead. If you have a high resolution camera, however, you can spend some of those extra pixels by zooming out so that the entire frame you're trying to reproduce is surrounded by a margin not in the original picture. This keeps material at the edges of the “then” image away from the edges of the frame where lens distortions are the greatest.
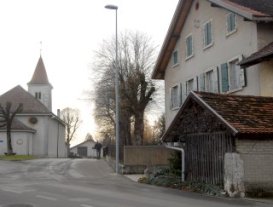
Whatever gear you've decided to use, it's now time to pack it up along with your annotated “then” prints and head out into the field to get the “now” shots to go with them. “Photography” means “writing with light”—light is the raw material of photography, not cameras and film or digital sensors, so it's worth devoting some time to thinking about light before setting out to write with it. In particular, look for highlights and shadows in your “then” photos; this will permit you to estimate the time of day, sometimes the season, and the weather when the original was taken. (In the example here, this is a bit of a “no-brainer” because you can see from the clock tower that it's about 14:40 in the afternoon, from the sky that there were scattered cumulus clouds, and from the shadows that the Sun was not obscured. One familiar with the region can infer that the picture was taken in the summer, since that's the only time of year such clouds boil up above the Jura mountains, which are hidden behind the buildings in this scene.) While you needn't slavishly try to replicate the conditions in the original—if, for example, it was taken on an overcast day (as many photographers prefer for architectural shots as strong shadows can hide the structure), and your “now” image has prominent shadows—they won't match as well. Also keep in mind the orientation of the scene and time of day you'll be taking the picture; you don't want to be shooting into a rising or setting Sun!
When you arrive “on location” take out your marked-up “then” picture and walk around until you find the spot in which the various relationships you've marked all come into alignment simultaneously. You may find yourself amazed at how small a displacement it takes to shift parallax of objects in the distance. You may be dismayed to find that no matter how hard you try, you just can't make it all work. There are a number of possible reasons for this. First of all, buildings change! If something doesn't line up, make sure the roof has the same shape as it did back then, or that somebody hasn't bricked up or punched through a window. Don't forget that a vantage point includes the vertical—you may discover the original was taken from a second storey or higher window, perhaps from a building which no longer exists, or that view camera adjustments were used to simulate a viewpoint you could attain only by climbing a precariously tall ladder. And finally, the viewpoint you're looking for may not exist any more: it may have been in an open area where a building now stands or behind a large tree which hadn't been planted when the original picture was taken. Every one of these things has happened to me in the course of this project. Don't obsess—the whole point of then and now photography is to show changes, and sometimes those very changes are going to limit your ability to reproduce historical images, Do your best, fix what you can in the subsequent image processing stages, and explain whatever discrepancies remain. People tend to be so enthralled by these “time warp” images they'll overlook the inevitable warts.
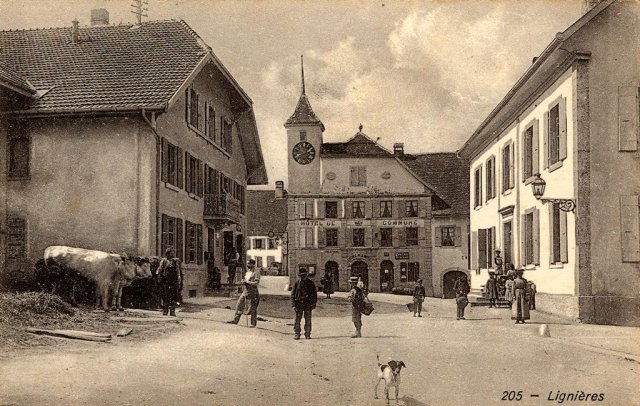
Above is the “now” image I took, just as it was captured, unprocessed except for stretching the contrast of the RAW image to the full intensity range and scaling the original 3900×2616 pixel image to fit on this page. The photo was taken with the Nikon D200 and 12–24 mm lens at 17 mm focal length with an exposure of 1/160 second at f/5 on 2006-11-20 at 15:53 local time. If you compare this image to the marked up original above, you'll see that in this case I was able to line up all of the relationships I'd marked.
A few words on safety—while a project like this is cool, at least if you're a photography nerd like me, it isn't worth dying for. That is, however, a risk you must ponder since you'll find that the viewpoint from which many of the photos you'll be taking is right in the middle of a street or highway. Back in horse and buggy days, setting up a tripod there might have spooked the horses, terrified by ancestral memories of Martian fighting machines, but cars whipping around blind corners are another matter entirely. Fortunately, Lignières is not Manhattan, Swiss drivers are more courteous and cautious than those of many other places, and since we have a riding stable in the village with people on horseback frequently on the streets, drivers tend to be especially careful since you never know what you may find around a corner. Still, if you become absorbed in finding just the right vantage point for a photo, you might forget to look both ways before stepping out into a street—with potentially tragic consequences. Be vigilant, and if you're shooting in a particularly hazardous area, try to enlist a friend to act as “look-out” to watch for traffic while you concentrate on the viewfinder.
At this point you may wish to do some preliminary processing of the best of the “now” images you've taken. If you use the RAW image captured by the camera (which gives you more colour depth and freedom to control the brightness transfer function, white balance, and sharpness) use your image processing program to perform these adjustments. I prefer not to sharpen the “now” image at this point, but defer that until all of the alignment image processing to be described below is complete. Multiple sharpenings of an image lose detail and can introduce artefacts.
Whatever processing you do at this stage, save the resulting “now” image in a lossless format. If you're using Adobe Photoshop, the best choice is its own native “.psd” format. I name such files after the series and number like “LI25_now_original.psd”.
Recall that we've already scaled the “then” image to the final desired size for the pair. The “now” is the full size captured by the digital camera, which will be much larger. (If it isn't larger, you won't have enough pixels to perform the subsequent image processing without losing sharpness.) To align the images, we need first to determine their size ratio. Choose a feature which is clearly visible in both images, appears near the centre of the frame, and is reasonably large (while not going too close to the edge). In the images above, I used the line visible on the building at the centre of the frame which runs from left to right where the roof and bell tower join the main structure. Using the measure function in your image processing program, determine the size in pixels of this feature in both images. In this case, in the “then” image, the chosen feature has 237 pixels, while in the “now” image it has 675. (These are for the full resolution images, not the scaled down illustrations which appear here.) Note these values for later use; I write them on the back of the print-out of the “then” image.
This next step is going to seem a tad counter-intuitive, but bear with me: it really does make sense. Load your processed “then” image into the image processing program and scale it up until the feature you measured in it is the same size as in the “now” image. This is accomplished by taking the width of the “then” image, multiplying by the size of the feature in the “now” image, and dividing by its size in the “then” image. In this case our “then” image is 1024 pixels wide with a feature size of 237 pixels, while the same feature in the “now” image measures 675 pixels. The rescaled width is thus ((1024×675)/237)=2916.
Use the scale or image size command to scale up the “then” image to this size, preserving the aspect ratio of the original. It will look horrible—don't worry, this is just an intermediate step. Leave this image open; you needn't save it to disc. Do not, in any case, save it back and overwrite your “then” image: if you wish to save it, store it with a different name. The above is a detail from the 2916×1848 pixel scaled-up “then” image.
Finally, we're ready to start bringing the two images together. Load your processed “now” image into the image processing program, keeping the scaled-up “then” image open. If you're using Adobe Photoshop, you'll need to convert the image mode from 16-bit to 8-bit, since many of the editing commands we'll be using from here on do not (regrettably) work on 16-bit images. Also, for some screwball reason, the background layer containing the “now” image is “locked” and I cannot figure out how to unlock it. Duplicate the background onto a new layer named “Now”, then delete the background layer to save space.
Create a new layer, initially transparent. Photoshop will just name this “Layer 1”; I just leave it as that, but if you're super-fastidious you may wish to rename it “Then”. In any case, after creating the new layer, paste the scaled-up ”then” image into it. After pasting the image, set the opacity of the layer containing it to about 50% so you can see the “then” image overlaid on the “now” image. You should then see something like this:
You can see that although the two images don't align, the scale of the building in the centre is pretty much the same. At this point I save this composite image in the native format of the image processing program under a name like “LI25_pair.psd”.
Make the layer containing the “now” image current and use the “Move” tool to drag it until the feature you measured in the two images aligns as closely as possible. Although the scaling should have ensured the feature is the same length in both images, it may not align because they are rotated with respect to one another. If this be the case, align the feature at the centre.
Here are our two images after rough alignment. These images coincide much better at this stage than many you're likely to encounter, but even images with gross differences in perspective can be dealt with in the next step.
At this point, I must sadly abandon the conceit of vendor neutrality and speak in the dialect of Adobe Photoshop. I have about as literal a love-hate relationship with Adobe as one can imagine: I love their products and technologies, but I find Adobe as difficult to do business with as any company I have ever encountered. Don't ask me for the stories—you wouldn't believe them if I told you. Anyway, we must speak of Photoshop since, at the moment, only it implements the “free transform” which is essential for correcting the differences in perspective, rotation, scale, and shear between the “then” and “now” images.
In a brief document such as this, I cannot hope to provide a tutorial on use of the Photoshop free transform tool; I can only proffer a few tips. First of all, select the layer containing the “now” image for manipulation. You do not want to transform the “then” image: any time you spend doing so will be wasted. Because you may need to drag the “handles” of the “now” image outside its current boundaries, you'll want to zoom out one or two steps before using the free transform to align the images. Move the origin of the rotation axis to the middle of the feature you measured and then, if the feature doesn't line up, rotate the “now” image to align it with the ”then” image. After this correction, you will probably discover that the scale of objects at the left and right of the frame is different between the images. Use the Perspective Correction facility to adjust the differential scale of these sides of the images until things line up as well as possible. Note that as you make adjustments, you may need to drag the image so the centre lines up. Beware of extreme adjustments; if you look at the centre, you'll find they usually tilt or otherwise warp the image unacceptably.
Here's the image after perspective correction. It isn't perfect; you'll find that perfection is unachievable with the transformations provided by Photoshop; note that the windows at the left of the frame don't line up and are mostly out of the frame in the “now” image. I save the transformed image in Photoshop native format under a name like “LI25_pair_transformed.psd”.
This image required relatively little perspective correction; I was able to take the “now” from almost precisely the same viewpoint as in the original, and this being a straight-on rectangular shot, the original photographer didn't appear to use any major camera adjustments. Many images, particularly those of relatively distant scenes, will be similar, but others, particularly close-ups or those with a mix of near and distant field objects, may require more extreme corrections.

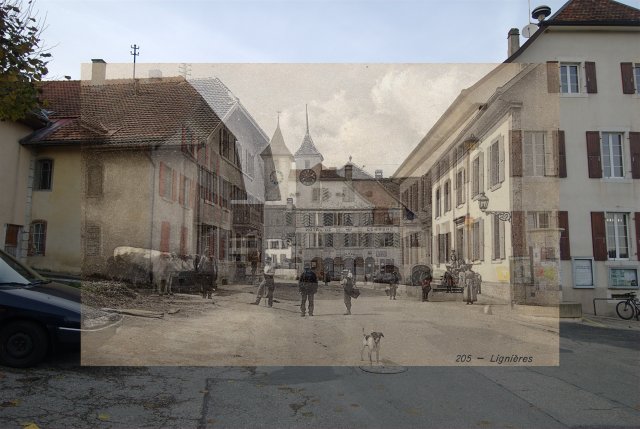
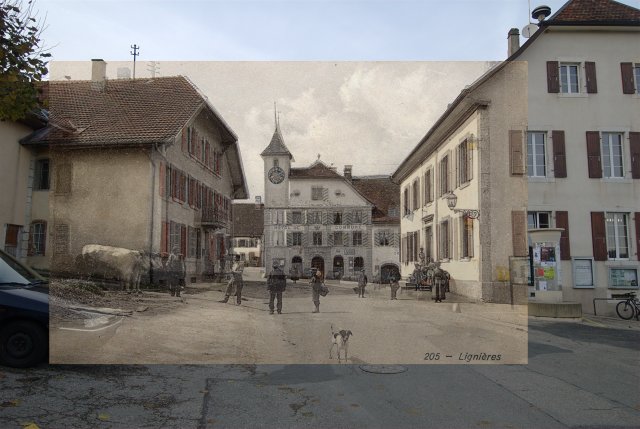
The images above, used to produce a gallery page showing a view toward the church at the entry to the village around 1908, is an example. Although I was able to take the “now” photo from almost the same vantage point chosen by the original photographer (determined from the relationships between features, as usual), the post card photographer appears to have adjusted the camera to make the church appear larger and closer than it actually is when seen from that point. This makes for a better-composed picture, although it isn't what you really see from that location. I have cropped the “now” image above from a wider frame so that it includes the same material as the “then” image to facilitate comparison. It's in situations like this that you really appreciate having a wide angle lens and lots of pixels in the image sensor. Below we see the full “now” frame, perspective corrected with Photoshop to approximate the “then” image, which is shown as a transparent overlay. Everything outside the boundaries of the “then” image will be cropped when making the final pair of images for the gallery.
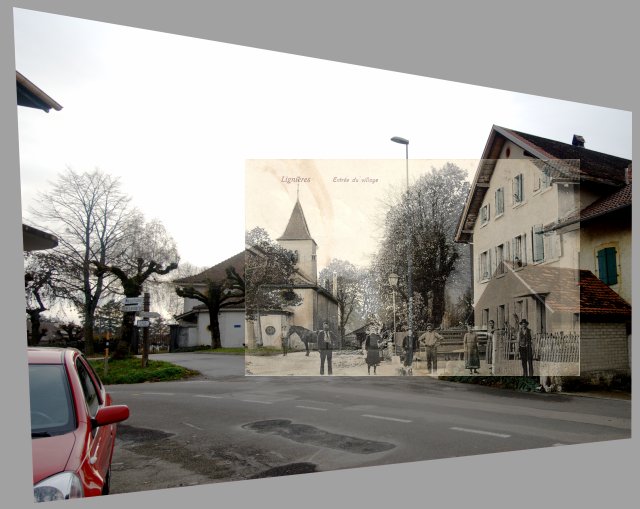
When performing perspective correction, it is important to do it all with a single free transform operation in Photoshop. Each free transform causes some loss of image sharpness, and if you do a bunch in succession trying to “tweak” the perspective to perfection, the image will be visibly degraded. It is most unfortunate that Photoshop does not allow you to toggle the visibility of layers or adjust layer transparency while a free transform is in progress: that would permit “blink comparison” of the “then” and “now” images. The best you can do is to make the “then” image about half transparent so you'll be able to see it overlaid on the “now” image layer as you transform it. If you need to apply large corrections to an image, as in the one above, you'll need to zoom way out before starting the free transform so there's enough room around the image that the transform “handles” don't run into the edges of the window as you drag them.
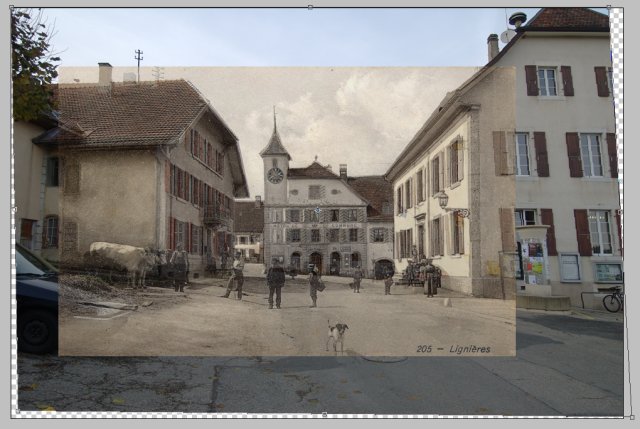
You'll note that the perspective of the “now” image still isn't quite right—look in particular at the roof in the upper right of the image. This is an example of one of those compromises with the light I discussed above. The “now” picture was taken in the late afternoon on a winter day directly toward the soon-setting Sun. In order to keep the Sun out of the picture, I had to shift sideways to hide it behind the bell tower of the church, which shifted the perspective from the original. I plan to re-shoot this image under better conditions, but I include it here to demonstrate the difficulties one may encounter.
Now we can scale the transformed “Now” image so that it overlays the processed “then” image previously prepared. The scaled-up “then” image was just a reference so we could transform the “now” image at full resolution with minimal loss of sharpness. Scale the transformed pair image prepared above to the same scale as the transformed “then” image; this is the inverse of the scale-up of that image. If, for example, the width of the transformed pair image is 3900 pixels, you would scale it to a width of 3900×(237/675)=1369 pixels, resulting in an image of 1360×918 pixels.
Choose the layer of the scaled transformed image produced in the last step which contains the “now” image, select its entire contents, and copy that to the clipboard. Load the processed ”then” image (not the scaled-up version, which you can now discard), create a new layer, and paste the scaled transformed “now” image into it. Set the transparency of the new layer to about 50% and move the new layer into alignment with the “then” image in the background. If everything lines up reasonably well, you're done and can proceed to taking off the final images in the next step. If not, go back and adjust the correction of the images to achieve a better alignment. You may discover, especially in your early outings, that you've misjudged your choice of viewpoint and there's nothing you can do in Photoshop to make the images align. Welcome to the iterative school of asymptotic photography! Go back out to the location, re-shoot the “now” image and try again. You'll probably find that after three or four attempts you'll have developed an eye for geometric alignments you never paid attention to previously and that, in doing so, you've become a better photographer.
Here are the “then” and “now” images aligned. There are a few discrepancies, but the viewer's eye will be attracted to the centre of the image where everything lines up closely. After aligning the images, set the opacity of the “then” layer back to 100%. You can then toggle the visibility of the layer on and off to flip back and forth between the two images, previewing how they will appear on an image swapping Web page.
At this point you may wish to modestly sharpen the “now” layer, especially if rotation and perspective correction have softened it noticeably. Don't overdo it: an over-sharpened image looks awful, especially in alternation with a “then” image which is probably on the soft side. Save this image in your image processing program's native format with a name like “LI25_pair_final.psd”.
You can now extract the aligned “then” and “now” images from the final pair and compress them for the Web or prepare them for printing or publication. Set the “then” and “now” layers visible successively and export the images as JPEG files (for the Web), or TIFF or PNG files (for printing or publication).
This process may seem complicated and tedious, but once you've produced a few images you'll find you spend most of your time scanning the “then” images and shooting the “now” photos; the image processing is straightforward in most cases once you've become familiar with the tools and resigned to the reality that perfect alignment is rarely achievable.
If you wish to present your images on a Web page that swaps between “then” and “now” as these gallery pages do, look at the HTML source for one of the gallery pages and the then_now.js JavaScript program which manages the image swapping to see how it's done.
The following list summarises the steps involved in making a “then and now” picture pair.
|
by John Walker November, 2006 |
|