How to Replace the Fluorescent
Starter in a Windhager Bug Zapper
Once
upon a time, almost everybody
routinely repaired household appliances, relying on their
adult common sense not to do something idiotic, and taking
responsibility for their actions in any case. That was before
the dark times: before eternal adolescence, litigation lotteries,
and the dumbing down of citizens into consumers. This document
is intended for old-timers who understand that it's not just
a bad idea to stick your finger into something that's plugged into
a mains socket, but so incredibly dumb you should die of embarrassment
for having done so long before the fibrillations cease.
If you don't “get” electricity, or are offended by this disclaimer,
just throw out your old bug zapper and buy a new one.
Fourmilab is surrounded on three sides by
farmland. In
the summer, bugs are everywhere. (That's flying Arthropoda,
not Phylum Informatica, which are
abundant all year round.)
 Faced with this situation, defence in depth is the only option:
window screens, bats,
Odonata
on the pond, fly strips on the windows and swatters in every
room, and as the last level of terminal defence, high voltage
bug zappers with ultraviolet fluorescent lures.
Faced with this situation, defence in depth is the only option:
window screens, bats,
Odonata
on the pond, fly strips on the windows and swatters in every
room, and as the last level of terminal defence, high voltage
bug zappers with ultraviolet fluorescent lures.
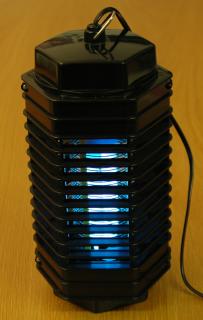
These are not elegant devices, but they get the job done. The
principle couldn't be simpler—flying insects, whose compound eyes
see long-wave ultraviolet light that mammalian eyes don't, are attracted
by the lure tube, which appears to emit a dim blue light to
humans. To reach the light, they have to fly between wires electrified
with between 4 and 8 kilovolts which, when the insect completes
the circuit, kill-a-bug.
The only drawback (at least if you aren't a flying insect) is
that they don't seem to last very long. After a little more
than one summer, the bulb either starts to flash on and off
like a strobe light or simply refuses to light at all.
Replacement bulbs are readily available and easy to install,
but in my experience, at least half the time replacing the bulb
doesn't fix the problem. With no light to attract the insects,
a zapper is useless, so even though its high voltage subsystem
continues to work perfectly, most people junk it when changing
the bulb doesn't make it light up.
I'm way too cheap to be happy with such a state of affairs,
so I decided to open up a failed bug zapper and see what was going
on. The source of the problem proved to be as simple as I expected
and as straightforward to remedy, so in the hope of saving
somebody else the trouble of figuring it out, I've scribbled these
notes on how to repair your own bug zappers. These instructions
pertain to bug zappers made by the Windhager company of Salzburg,
Austria, who have a dominant market share in this
obscure industry here in Central Europe. Obviously, if you have a
bug zapper made by another company, it's going to look
different inside and may conceivably use an entirely different
circuit for the fluorescent lamp.
Unless you understand
what you're doing and know enough electronics to be confident
you're not going to do something stupid, it's best to leave
things well enough alone and get a new bug zapper. Further,
we're going to be disassembling and modifying a device which,
when opened up, has exposed connections to potentially lethal
mains current and extremely unpleasant if not deadly high
voltage. If you are sufficiently stupid or scatterbrained that
you're likely to forget to pull the mains plug before sticking
your hand inside the guts of a bug zapper, you should stop
reading immediately and choose some safer project, like
making microwave popcorn.
Opening it up
First of all, before beginning this procedure, be sure to try
replacing the bulb and see if that fixes the problem. If it
does, you've saved a lot of time and, if not, you're going to need
a replacement bulb sooner or later, so why not have one on
hand when the time comes? If a new bulb doesn't do the trick,
the problem is almost certainly a failed fluorescent starter
inside the box, so we'll need to open it up.
You did remember to unplug the
zapper before starting to disassemble it, didn't you?
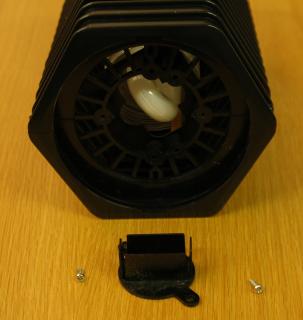
First, remove the bug catcher tray at the bottom of the zapper,
 taking care not to spill dead bugs all over the floor or
your work area. (Since that's how you get to the bulb to
replace it, odds are you've already removed it along with the
bulb retainer.)
taking care not to spill dead bugs all over the floor or
your work area. (Since that's how you get to the bulb to
replace it, odds are you've already removed it along with the
bulb retainer.)
Depending on the model, the two halves of the body of the bug
zapper are fastened together with four or six screws. On
“industrial” models, these are 2 mm metric machine screws and
nuts, but some “consumer” models use infernal “split slot”
screws which are intended to keep you from opening up the
device. You see, you're a consumer, so you're
expected to consume—buy, buy, buy, not mend things
which break. Heck with that…you can
either grind off the little bar in the middle of the screw with
a Dremel tool or, what I find much easier, “start” each screw
by using a small pair of diagonal
 cutters as a spanner wrench, after which you can easily remove the
screw by placing a small screwdriver blade in either side of the slot.
Once you've removed these awful screws, see if you can find proper
replacements with civilised heads in your junk box. If so,
throw away the originals. If you can't find suitable replacement
screws, you can re-install the originals by reversing the removal
procedure, or you can open up the slot on the screw with a few
strokes on a hacksaw blade.
cutters as a spanner wrench, after which you can easily remove the
screw by placing a small screwdriver blade in either side of the slot.
Once you've removed these awful screws, see if you can find proper
replacements with civilised heads in your junk box. If so,
throw away the originals. If you can't find suitable replacement
screws, you can re-install the originals by reversing the removal
procedure, or you can open up the slot on the screw with a few
strokes on a hacksaw blade.
 In some industrial models, once you've removed the screws holding
the two halves together, you'll also need to remove the hanger
loop from the top, as it connects the two halves. Spread it with
pliers and slip it free of one of the two body halves. In the
consumer model pictured here, the hanger is attached to a separate
top cap and need not be removed.
In some industrial models, once you've removed the screws holding
the two halves together, you'll also need to remove the hanger
loop from the top, as it connects the two halves. Spread it with
pliers and slip it free of one of the two body halves. In the
consumer model pictured here, the hanger is attached to a separate
top cap and need not be removed.
If the bug zapper has been in service, even if you've assiduously
cleaned it with the little brush provided, odds are when you open it
up it'll still be pretty gnarly inside. This is a good time to
vacuum the zapper wires, being careful not to bend them.
Caution: like the
picture tube in a television set, the zapper wires can retain a
residual charge for some time after you unplug the device. If
it's been recently plugged in, it's best to short out two adjacent
wires with a screwdriver with a well-insulated handle to avoid
nasty surprises should you accidentally touch the wires.
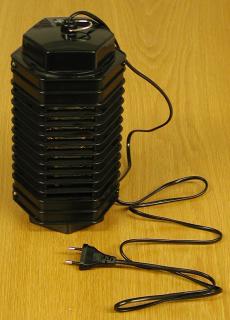
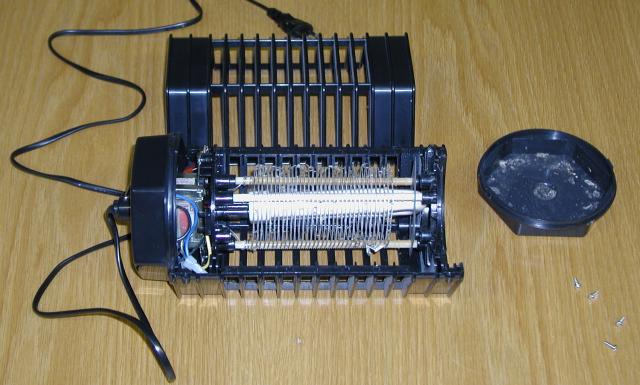
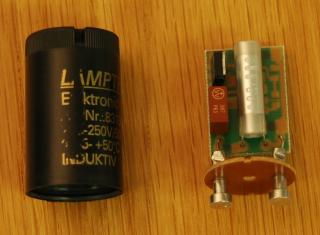
Below is a “before” picture, after disassembly, but with the
top cap still in place and the zapper wires yet to be cleaned.
Finding and removing the old starter
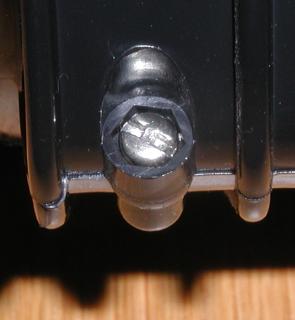
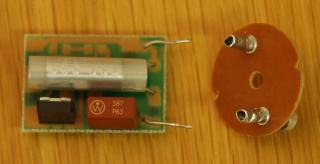
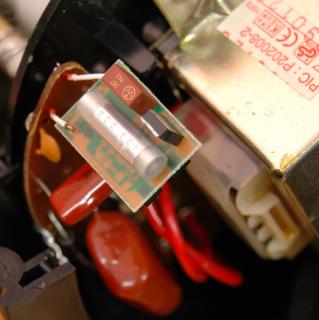
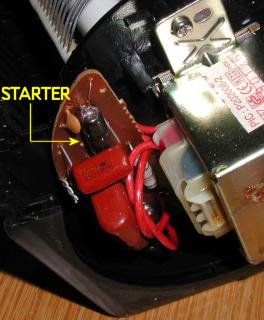 Removing the top cap of the zapper, which simply fits in a slot in
the two halves of the body, reveals the electronics assembly.
This varies from model to model, but there will always be a transformer
and printed circuit board on which a fluorescent starter is installed.
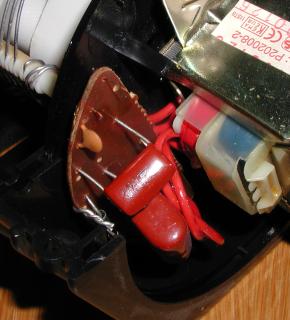
The starter is a small glass tube which may be clear or have
a silvered interior, and may or may not have a bypass capacitor
attached to its leads. In the photo at the right, the starter
is pressed down against the board and its bypass capacitor
is mounted separately on the board. If the bypass capacitor
is attached directly to the starter, it may be removed since the
replacement starter will include its own capacitor.
Removing the top cap of the zapper, which simply fits in a slot in
the two halves of the body, reveals the electronics assembly.
This varies from model to model, but there will always be a transformer
and printed circuit board on which a fluorescent starter is installed.
The starter is a small glass tube which may be clear or have
a silvered interior, and may or may not have a bypass capacitor
attached to its leads. In the photo at the right, the starter
is pressed down against the board and its bypass capacitor
is mounted separately on the board. If the bypass capacitor
is attached directly to the starter, it may be removed since the
replacement starter will include its own capacitor.
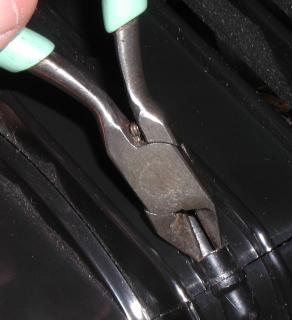
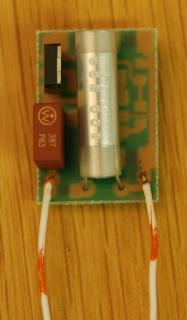
 Cut the leads to the starter close to the bulb and
discard the old starter, then bend the leads out from the board.
This will allow you to test the replacement starter and verify,
before proceeding further, that replacing the starter will, in
fact, fix the bug zapper's light. If it doesn't, there's no
point wasting any more time on the project.
Cut the leads to the starter close to the bulb and
discard the old starter, then bend the leads out from the board.
This will allow you to test the replacement starter and verify,
before proceeding further, that replacing the starter will, in
fact, fix the bug zapper's light. If it doesn't, there's no
point wasting any more time on the project.
Almost any fluorescent starter will work as a replacement, but
if you can obtain one, an “electronic starter” is the best
choice. These replace the glow tube and bimetallic contact switch
with solid state electronics, and provide a faster, “softer”
start which extends the life of the fluorescent tube. Further,
they won't attempt to endlessly restart a failing tube, avoiding the
annoying “disco strobe” effect so common with fluorescents at
end of tube life.
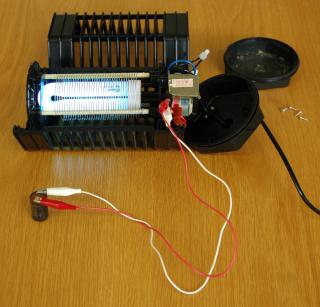 Whatever starter you choose, hook it up to the leads of the old
starter with insulated “Barney clips” (starters are
non-polarised; it doesn't matter which starter terminal you
attach to which lead) and then, being sure to keep your hands,
feet, tongue, and prehensile tail well away from the apparatus,
plug it in and see if the tube lights. If so, you're in
business and may proceed to install the new starter
permanently. If not, unplug the
zapper and make sure the starter is properly
connected to the leads of the old one. If there's no problem
there, try changing the bulb and see if that fixes it. If it
doesn't, you have a seriously dead zapper which is best
consigned to the junk box to be plundered for parts in some
future “basement science” project.
Whatever starter you choose, hook it up to the leads of the old
starter with insulated “Barney clips” (starters are
non-polarised; it doesn't matter which starter terminal you
attach to which lead) and then, being sure to keep your hands,
feet, tongue, and prehensile tail well away from the apparatus,
plug it in and see if the tube lights. If so, you're in
business and may proceed to install the new starter
permanently. If not, unplug the
zapper and make sure the starter is properly
connected to the leads of the old one. If there's no problem
there, try changing the bulb and see if that fixes it. If it
doesn't, you have a seriously dead zapper which is best
consigned to the junk box to be plundered for parts in some
future “basement science” project.
Installing the new starter
 A standard fluorescent starter will fit just fine “under the hood” of
all of the bug zappers I've repaired, but there's a problem
connecting the starter to the zapper's PC board. The
“Frankenstein
monster”
terminals on most starters are made of aluminium, to which
regular solder won't stick, and their cylindrical shape makes it
difficult to get a secure connection by crimping. Rather than
disassemble a junk starter socket or some other
expedient, I find it just as easy to remove the “guts” from
the starter and attach them directly to the bug zapper PC
board. You can usually remove the starter case by inserting
a sharp object such as jeweller's tweezers between one of
the notches on the end-cap and the case and levering the cap off.
Here's an electronic starter with the case removed.
A standard fluorescent starter will fit just fine “under the hood” of
all of the bug zappers I've repaired, but there's a problem
connecting the starter to the zapper's PC board. The
“Frankenstein
monster”
terminals on most starters are made of aluminium, to which
regular solder won't stick, and their cylindrical shape makes it
difficult to get a secure connection by crimping. Rather than
disassemble a junk starter socket or some other
expedient, I find it just as easy to remove the “guts” from
the starter and attach them directly to the bug zapper PC
board. You can usually remove the starter case by inserting
a sharp object such as jeweller's tweezers between one of
the notches on the end-cap and the case and levering the cap off.
Here's an electronic starter with the case removed.
 The components are all mounted on a printed circuit board with two leads
crimped into the terminals on the end cap. You can un-crimp these
by squeezing them with pliers across the long axis of the crimp,
whereupon the leads will pop out as illustrated at the right. A
traditional glow tube starter will just have the tube and bypass
capacitor crimped to the terminals instead of a printed circuit
board.
The components are all mounted on a printed circuit board with two leads
crimped into the terminals on the end cap. You can un-crimp these
by squeezing them with pliers across the long axis of the crimp,
whereupon the leads will pop out as illustrated at the right. A
traditional glow tube starter will just have the tube and bypass
capacitor crimped to the terminals instead of a printed circuit
board.
 The leads on the electronic starter circuit board aren't long enough
for our purposes, so I grip the circuit board by the edges in a
vise and remove them, replacing them with hookup wire salvaged from
telephone installations. This wire's insulation isn't rated for
230 Volts, but that's no problem since we'll provide plenty of air space
between the wires when connecting the starter to the zapper PC
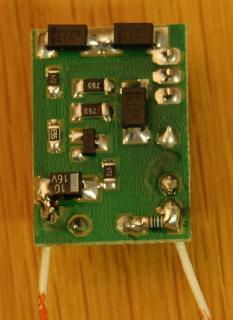
board. To the left, for your curiosity, is a picture of the
other side of the electronic starter circuit board. Yep, those are
surface mount components on the solder side of the board—amazing.
The leads on the electronic starter circuit board aren't long enough
for our purposes, so I grip the circuit board by the edges in a
vise and remove them, replacing them with hookup wire salvaged from
telephone installations. This wire's insulation isn't rated for
230 Volts, but that's no problem since we'll provide plenty of air space
between the wires when connecting the starter to the zapper PC
board. To the left, for your curiosity, is a picture of the
other side of the electronic starter circuit board. Yep, those are
surface mount components on the solder side of the board—amazing.
 Now, remove the old starter's leads from the zapper's PC board and
solder the leads of the new starter in their place. Keep the leads
short and well spaced apart. You may need to bend the new starter down
toward the PC board a bit to make it fit under the top cap of
the zapper, so leave enough lead length to permit this.
Now, remove the old starter's leads from the zapper's PC board and
solder the leads of the new starter in their place. Keep the leads
short and well spaced apart. You may need to bend the new starter down
toward the PC board a bit to make it fit under the top cap of
the zapper, so leave enough lead length to permit this.
At this point you'll certainly want to test the zapper again,
remembering to keep all tender and conductive appendages well
away from the works while it's plugged in. If you're rewarded with
blue light and the blessed absence of smoke, sparks, and loud
noises, congratulations!
Unplug the zapper and proceed with
reassembly, reversing the disassembly process.
 With the consumer zapper, it is almost possible to assemble one or
both of the two halves upside down. If you do this, you probably
won't be able to get them to close completely and you certainly won't
be able to install the bug tray. Make sure the two square
notches for the bug tray are at the bottom, at the other end from
the electronics. You may also have difficulty closing the halves
if one of the end rings is not seated properly. There's a notch in
each ring which matches a key in the body halves—rotate the end
ring until the notch snaps into place. Finally, replace
the bulb retainer at the bottom of the zapper.
With the consumer zapper, it is almost possible to assemble one or
both of the two halves upside down. If you do this, you probably
won't be able to get them to close completely and you certainly won't
be able to install the bug tray. Make sure the two square
notches for the bug tray are at the bottom, at the other end from
the electronics. You may also have difficulty closing the halves
if one of the end rings is not seated properly. There's a notch in
each ring which matches a key in the body halves—rotate the end
ring until the notch snaps into place. Finally, replace
the bulb retainer at the bottom of the zapper.
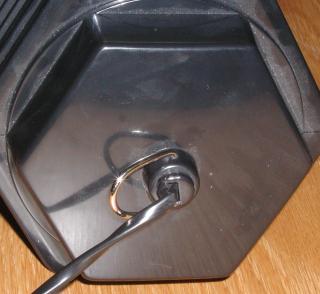
 Here's the re-assembled zapper with the bulb retainer re-installed.
Replace the bug tray (you don't want to forget
that detail!) and you're done.
Here's the re-assembled zapper with the bulb retainer re-installed.
Replace the bug tray (you don't want to forget
that detail!) and you're done.
 Set the zapper upright on the table, plug it in, and bask in the cool
blue light of success. Then, you're ready to put the zapper back
into service. Zappers work best when hung from the ceiling or set in
a high place (on top of a bookcase, for example).
Set the zapper upright on the table, plug it in, and bask in the cool
blue light of success. Then, you're ready to put the zapper back
into service. Zappers work best when hung from the ceiling or set in
a high place (on top of a bookcase, for example).
Of course, if you're a real engine-ear, you might
want to stress-test the repaired zapper before installing it
in an inaccessible location. You could, for example, plug it
into an
Internet
power strip and write a Perl program to power-cycle
it 100 times over a day at random intervals to test hot and
cold re-starts of the fluorescent. Naturally, this author
would never contemplate doing something that
absurd…scribble, scribble, scribble.
This document is in the public domain. Permission to use,
copy, modify, and distribute this document for any purpose
and without fee is hereby granted, without any conditions
or restrictions. This document is provided “as is”
without express or implied warranty.