|
|
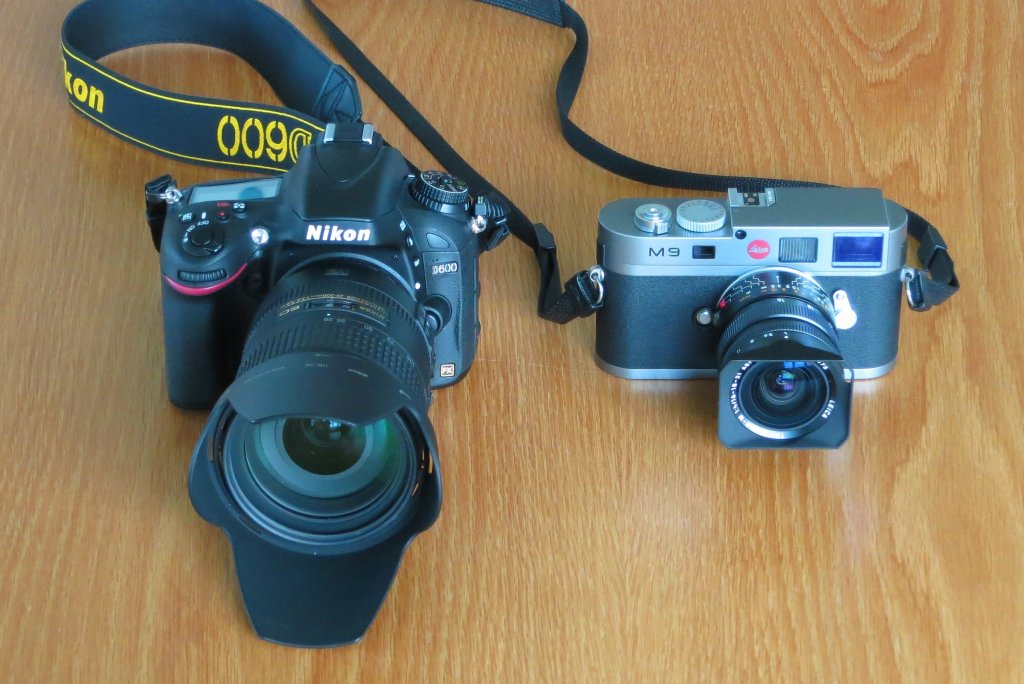
| 2013-05-12 12:52 UTC | Click image for reduced size. |
When I first visited CERN in 1996, I neglected to bring a camera, something I've regretted ever since. This time, I wanted to make the most of my visit, and I weighed at some length the best solution to obtain images of the enormous objects, seen at close range, under challenging lighting conditions, and under the time constraints of a brief visit. I wished there were a photographic guide for visitors to CERN and searched in vain for one. So, now that I've been there, I figured I'd write it for you.
I'll begin by describing what I settled on for the trip. I do not intend to recommend gear—the results you get depend upon your skill in using what you have. I chose what I took on the trip based upon what I had and what seemed most likely to produce interesting images.
From my 1996 trip, I expected to encounter difficult available light situations, a need for focal lengths ranging from wide angle to telephoto, and, in the detector halls, challenging circumstances requiring ultra-wide-angle lenses because it is not possible to get far enough from the subject to fit it in even a wide angle frame.
Realising that it may make me look like a tourist and caring not a whit that it did, I settled on a two camera solution. For general photography I used a Nikon D600 digital SLR with a Nikon 28–300 mm autofocus, image-stabilised lens. This camera and lens can do almost anything you need to do in general photography, and most of the pictures in this gallery were taken with it. I normally use it in “Program” mode, where the camera sets the aperture and shutter speed automatically, with the ISO sensitivity manually set to 100 for the lowest noise. In low light conditions I increase the ISO to a value sufficient to obtain a shutter speed of 1/30 second or greater. In difficult circumstances where one doesn't have the time to fiddle with the camera, I use the “U1” preset position to enable Auto ISO, with the camera configured to automatically choose an ISO setting up to 1600 to keep the shutter speed at 1/30 or faster.
The one capability the Nikon zoom lens lacks is the ultra-wide-angle focal length range. I do not have a full-frame Nikon lens which covers this range, and even if I did the last thing I'd want to do with my limited “time on target” in the detector halls is fumble around changing lenses. That's why I also brought along a Leica M9 rangefinder digital camera with the Leica Tri-Elmar-M 16-18-21mm f/4 ASPH ultra-wide multi-focal-length lens. (It's actually a parfocal zoom, but since Leica have no way to adjust the finder frame to intermediate focal lengths, they don't tell you this. Still, the lens works perfectly at intermediate focal lengths between the detents, and you can use digital image review to see if you got what you intended to.)
From my 1996 visit I recalled that in the detector halls you're confronted with enormous machinery seen at such close quarters that it exceeds the human visual field, not to mention that of most camera lenses. A fisheye lens is a possible solution, but the distortion such lenses produce would make it difficult to interpret what one actually saw from a photo. With a linear ultra-wide-angle there is distortion, but for the most part straight lines stay straight and the eye can figure out what's going on. So, I decided to use the Leica for pictures of the detectors and the Nikon for everything else, and I'm reasonably satisfied with the results.
The Leica viewfinder does not show the field of view of the ultra-wide-angle lens. This requires an auxiliary finder which, while it works fine, is large and clunky. I decided to leave it at home, since I knew I'd be shooting almost everything at the minimum focal length of 16 mm, and I could frame and focus on the centre of the image, then look at the review image on the LCD to be sure I'd included everything I intended to.
All photography in the detector halls is by available light, and that light is relatively dim and very uneven. There are circumstances where you're trying to photograph part of the detector and there's no way to exclude fluorescent lights which shine directly into the lens. This may perplex the camera's automatic exposure mechanism; be sure to configure the camera to display the image histogram on the review image and set exposure compensation or flip to manual exposure when necessary. Available light is, of course, all you have. Given the scale of what you're photographing, an on-camera flash is as useless as when morons use them when photographing sporting events or solar eclipses, and may be annoying enough to get you ejected from the tour. The detectors would be an ideal subject for high-dynamic-range imaging, but taking the multiple exposures required usually requires a tripod, which I thought completely impractical to carry around and set up in the cramped surroundings of the detector halls.
Getting everything in focus is a challenge. The low light means you have to use large apertures to keep shutter speeds fast enough to avoid blur from camera motion, but that reduces depth of field, and when you're photographing something like the ATLAS detector, which is 25 metres in diameter, from a vantage point around 10 metres from the edge, you need all the depth of field you can get. Fortunately, super-wide-angle lenses have great depth of field and are tolerant of modest focussing errors, so while getting good pictures is a challenge, it's not impossible.
When using the Leica to photograph the detectors, I always focussed on the middle distance and relied upon the depth of field to bail me out in the near and far parts of the subject; this worked to my satisfaction. What I wish I'd known before the trip is that it's best to set the Leica to Auto ISO rather than trying to adjust ISO on the fly and hand hold exposures of 1/15 second and longer. I am usually wary of Auto ISO, especially on cameras like the Leica M9 where high ISO performance is mediocre, but it sure beats losing around half of your pictures to blur from hand holding exposures that only pure luck can render sharp. That happened to me on this trip, but fortunately I took so many pictures that I got at least one sharp image of each scene I photographed.
I photograph for Web documents like these, where a large image may be 1024×768 pixels, not gallery prints where every pixel matters. It's easy to forget that high ISO noise which may be objectionable when you're looking at an image pixel-by-pixel on a computer screen may be imperceptible when the image is scaled down for publication on the Web.
In summary, when visiting CERN, especially the detector halls, be sure you have a camera and lens which cover the ultra-wide-angle range and is configured to permit hand held photography in relatively dim available light conditions, even if it means using an ISO sensitivity which introduces noise into the image. Take the time to review the histogram of each image you take, and apply exposure compensation if automatic exposure has not properly exposed what you're trying to capture. The range of light and dark in the images you get will likely be so large that to make the most of them you may need to do substantial post-processing, perhaps starting with camera raw images, to approximate what the eye, with its logarithmic response, perceived.
Finally, don't spend all, or even much, of your time looking through a viewfinder. Take in the spectacle with your eyes, appreciating that you are extremely fortunate to be able to see this summit of the human quest to understand the universe we inhabit, and that this may be the only chance you ever get to do so.
|
by John Walker May 12th, 2013 |
|
This document is in the public domain.