
Totality Composite
Production Notes
|
|
Eclipse 2001 Totality Composite Production Notes |
|
| by John Walker | ||
The intensity range of the various phenomena during a total solar eclipse exceeds what photographic film can record or computer screens display. The human eye responds logarithmically--it's able to simultaneously perceive light intensities which differ by several orders of magnitude. Film and computer displays are (more or less) linear and constrained to a much smaller intensity gamut.
While it's impossible to reproduce the naked-eye experience of totality, one can, given a collection of photographs taken with different exposures, assemble a composite image which better approximates the visual appearance of an eclipse than any single photograph. This document describes the technique used to prepare the composite image in the photo gallery.
Production of a composite involves selecting the individual images to be merged, registering them so they precisely overlap one another and share the same angular orientation, then choosing the transfer functions and parameters which determine how each contributes to the final result. In the following sections, I'll describe how the composite was assembled from the bottom up--layer by layer. In each section I'll show the inputs to the image processing operation and the intermediate output from that step. All of these images are scaled to 256×256 pixels and surrounded by a red border to set them off from the page background. The actual composite was prepared at a resolution of 1024×1024 pixels without a border.
This composite was produced using The Gimp, the GNU Image Manipulation Program on the Linux operating system.
| × |
| = |
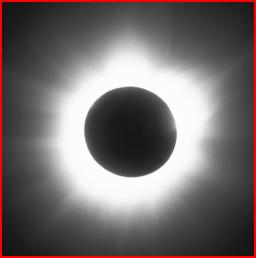
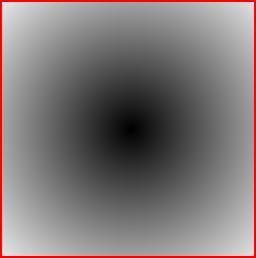
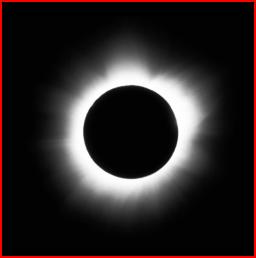
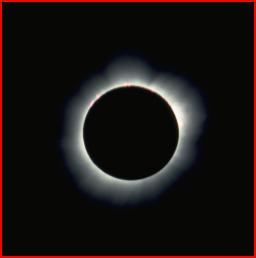
 I started with the image in
the photo gallery which best captured the outer corona and
coronal streamers. This exposure (about three seconds at f/8 on
Kodachrome 64) completely overexposed anything closer than
about one solar radius so the overexposed portion must be
darkened to avoid its obliterating closer-in detail. To
accomplish this, I created a radial gradient mask on a
separate Gimp layer. The mask is centred on the image of the
Sun and smoothly varies from black at the centre of the Sun's
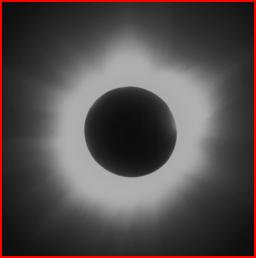
disc to white at the corners of the frame. Multiplying this
mask by the original image reduces the intensity close to the
Sun while preserving extended coronal detail.
I started with the image in
the photo gallery which best captured the outer corona and
coronal streamers. This exposure (about three seconds at f/8 on
Kodachrome 64) completely overexposed anything closer than
about one solar radius so the overexposed portion must be
darkened to avoid its obliterating closer-in detail. To
accomplish this, I created a radial gradient mask on a
separate Gimp layer. The mask is centred on the image of the
Sun and smoothly varies from black at the centre of the Sun's
disc to white at the corners of the frame. Multiplying this
mask by the original image reduces the intensity close to the
Sun while preserving extended coronal detail.
|
| + |
| = |
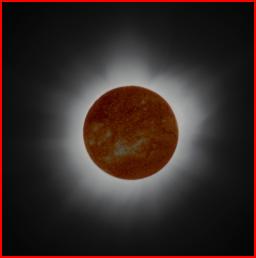
 Since a large portion of the image is the featureless black disc of the Moon,
I developed that prime real estate to add a
space-based perspective. During totality, the
Solar
and Heliospheric Observatory (SOHO) spacecraft imaged the Sun in
a variety of wavelengths. SOHO orbits the Sun around the L1
point, about 1.5 million kilometres sunward of the Earth. At that point
the gravitational fields of the Earth and Sun balance and with only a
small expenditure of propellant for orbit trimming, SOHO can remain in a
"halo orbit" around L1. This gives SOHO a 24 hour view of the Sun
unobscured by the Earth's atmosphere. Since its launch in December
1995, SOHO has amassed a comprehensive multispectral data set essential
for understanding the Sun and its influence on the Earth.
Since a large portion of the image is the featureless black disc of the Moon,
I developed that prime real estate to add a
space-based perspective. During totality, the
Solar
and Heliospheric Observatory (SOHO) spacecraft imaged the Sun in
a variety of wavelengths. SOHO orbits the Sun around the L1
point, about 1.5 million kilometres sunward of the Earth. At that point
the gravitational fields of the Earth and Sun balance and with only a
small expenditure of propellant for orbit trimming, SOHO can remain in a
"halo orbit" around L1. This gives SOHO a 24 hour view of the Sun
unobscured by the Earth's atmosphere. Since its launch in December
1995, SOHO has amassed a comprehensive multispectral data set essential
for understanding the Sun and its influence on the Earth.
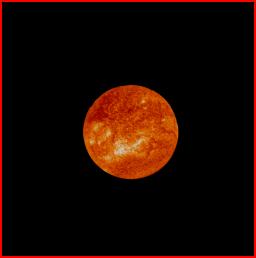
SOHO's space-based vantage point permits it to observe the Sun in spectral bands inaccessible to Earth-based telescopes due to atmospheric absorption. The Extreme ultraviolet Imaging Telescope (EIT) observes in four bands in the extreme ultraviolet from 17.1 to 30.4 nanometres: three spectral lines of Iron and the 30.37 nm line of singly ionised Helium (He II).
The He II line, produced primarily at temperatures between 60,000 and 80,000 °K is an excellent indicator of solar activity; active regions, flares, and prominences are easily identified at that wavelength. As part of the SOHO Eclipse 2001 Campaign, EIT images were captured before, during, and after the eclipse in each of the spectral bands.
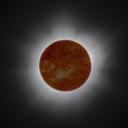
I selected the mid-eclipse He II image for the composite. This image was captured at 12:38 UTC on June 21, 2001, just about half an hour before totality reached our site in Zambia. I took the original 1024×1024 pixel SOHO image and scaled it so the Sun's image is the same size as the Moon's disc in the slides of totality. SOHO images show the Sun's north pole at the top. From our vantage point at 15°25' south latitude show the Sun's disc was rotated, so I rotated the SOHO image to align with it the ground-based photographs. (You can see the rotation by comparing the original SOHO image with North up to the rotated image above.)
I completed preparation of the SOHO layer of the composite by using a "cookie cutter" mask to trim the image at the solar limb. The SOHO image contains a beautiful view of the large prominence we saw from the ground, but it's cheating to overlay it on the photos of what we actually saw, so off it came.
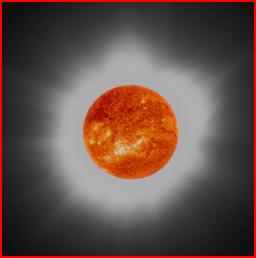
Adding the SOHO Sun's disc to the masked outer corona yields an image with disc
detail and streamers, but nothing but featureless grey in between. Now it's time to
do something about that.
|
| + |
| = |
 I next chose an image to highlight the
mid-corona and streamers closer to the Sun. Adding this image
to the result of the last step filled in detail closer to the Sun. In each
image addition, the contribution of both components is
adjusted by hand so they mix properly and make a smooth transition.
I next chose an image to highlight the
mid-corona and streamers closer to the Sun. Adding this image
to the result of the last step filled in detail closer to the Sun. In each
image addition, the contribution of both components is
adjusted by hand so they mix properly and make a smooth transition.
|
| × |

| = |
 Adding the inner corona consumed most of the limited dynamic range (just 256
levels) available on most computer displays, so I needed to dim the image somewhat
to make room for the inner corona and photosphere. I accomplished this by creating
a uniform grey mask and multiplying it by the stack so far, which compressed
the dynamic range into about two thirds of the available shades.
Adding the inner corona consumed most of the limited dynamic range (just 256
levels) available on most computer displays, so I needed to dim the image somewhat
to make room for the inner corona and photosphere. I accomplished this by creating
a uniform grey mask and multiplying it by the stack so far, which compressed
the dynamic range into about two thirds of the available shades.
|
| + |
| = |
 To extend the detail closer in to the Sun, I chose an image taken
earlier in totality which
captured the inner corona. This image was stacked atop those
already assembled and adjusted to blend smoothly with the detail further from the
Sun. Notice how the addition of this image makes the streamers extend
smoothly from the edge of the frame to close to the Sun's disc. This
accords with the visual impression of totality.
To extend the detail closer in to the Sun, I chose an image taken
earlier in totality which
captured the inner corona. This image was stacked atop those
already assembled and adjusted to blend smoothly with the detail further from the
Sun. Notice how the addition of this image makes the streamers extend
smoothly from the edge of the frame to close to the Sun's disc. This
accords with the visual impression of totality.
|
| + |
| = |
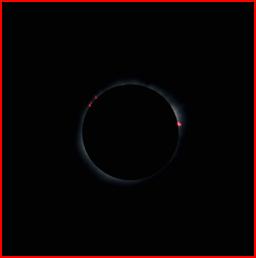
 The image added in the last step contains a hint of the prominences, but they're largely washed out
by the continuum emission of the inner corona. To "pop them out", I chose a 1/1000
second exposure from mid-totality, contrast stretched it to
enhance the prominences, then applied it as a "brightening screen" to the result of the
previous step. The prominences, primarily emitting the red Hydrogen alpha line,
enhance the red component of the inner corona and render the prominences visible
in the composite image.
The image added in the last step contains a hint of the prominences, but they're largely washed out
by the continuum emission of the inner corona. To "pop them out", I chose a 1/1000
second exposure from mid-totality, contrast stretched it to
enhance the prominences, then applied it as a "brightening screen" to the result of the
previous step. The prominences, primarily emitting the red Hydrogen alpha line,
enhance the red component of the inner corona and render the prominences visible
in the composite image.

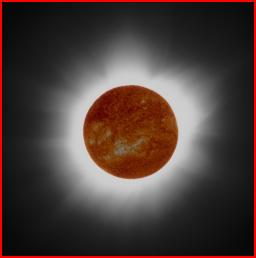
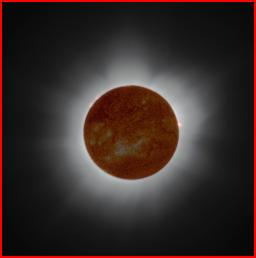
The final composite image is shown above at medium resolution, scaled from the full resolution original. Given the restrictions of computer displays, the source material at hand, and my own very limited talent for image processing, I'm reasonably happy with the outcome, which more closely approximates the visual experience than any of the original photos. The SOHO image, while hardly "ground truth", provides context for the phenomena observed around the solar limb. To the eye, the prominences were more...prominent, but I don't think I can achieve that effect without more dynamic range than a computer screen permits.